
Code and Companion Media
Including Code and Code Listings in Your Chapter
Chances are you will probably at some point need to include code in your book.
Unfortunately, the Word templates we use do not display code so that it appears on the printed page the same way it appears on-screen. You will have to enter hard returns and indent appropriately with spaces (not tabs). You can use the code-length check macro included on the SD Template Add-ins (It's the Tech Checks group in the SD Tech tab on the ribbon, once you've applied the template and selected the tech toolbar add-in) to determine whether or not your code is too long.
Here's a quick list of Dos and Don'ts that, if followed, should ensure that what you intend is what appears in the book.
|
DOs
|
DON'Ts
|
Additional issues about using code are explained in the following sections.
Formatting Code Correctly
- Use CodeSnippet as the default style for code blocks.
- Use CodeListing style for any code listings that have numbers and titles (and CodeTitle for the heading). The third code listing in chapter five would be given this title: Listing 5.3.
- Apply the CodeHighlight style to code that you want to appear in bold font (instructions on applying styles are here). Use it sparingly for lines that should be emphasized within a code block, and only if you refer to said lines in text (i.e. "The bold lines in the previous listing demonstrate..."). Using the CodeHighlight style instead of just making it bold using Word ensures that the bold font displays in e-reader devices.
- If you are using code in a sidebar, note, or warning, use the FeatureCodeSnippet, FeatureCodeListing, etc. styles.
- Important! If you are doing a book with color code, do NOT apply code styles, and immediately contact your PJE for special instructions.
A section titled "Wrox.com Code Downloads For This Chapter" must appear at the beginning of each chapter, following the "What's in this Chapter" heading and list. You have two options for presenting this information, but all the chapters in a title should be handled consistently. The suggested wording and formatting for each option is as follows:
- Option 1: Bullet list: The wrox.com code downloads for this chapter are found atwww.wrox.com/remtitle.cgi?isbn=0123456789* on the Download Code tab. The code for this chapter is divided into the following major examples: (followed by 3-5 item bullet list).
- Option 2: Paragraph/sentence: The wrox.com code downloads for this chapter are found at www.wrox.com/remtitle.cgi?isbn=0123456789 on the Download Code tab. The code is in the chapter xx download and individually named according to the names throughout the chapter.
*Note here that in www.wrox.com/remtitle.cgi?isbn=0123456789 is the 10-digit ISBN assigned for your book instead of the 0123456789 placeholder.
Line Wrapping
Sometimes a line of code is too long to fit on one line, as in this example:
Sub Execute_Batch (strSQL as string, strDSN as string, strUID as string, strPwd as string)
Because the SD Template is NOT wysiwyg, you won't know just by typing it in if a code line is too long. As you finish the chapter, you must check for code length, using the TechTools Add-in. Follow the instructions on your cheat sheet.
If your code line is too long, you can
- Insert a hard return as close to 83 characters as possible and indent the resulting new line (using spaces, not a tab). In most cases, this is sufficient to convey to readers that they are looking at one long line of code. For example, you could break the line as shown here:
Sub Execute_Batch (strSQL as string, strDSN as string, StrUID as string, strPwd as string)
Sub Execute_Batch (strSQL as string, strDSN as string, strUID as string, strPwd as string)
In this case, using code 80 doesn't help because the code is still too long to fit entirely on one line. You?ll just have to break it with a hard return and insert spaces to indent. If needed, you can add a Note icon to the readers reminding them that code should appear on one line.
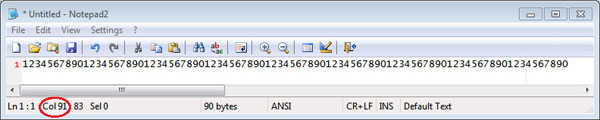
Figure 4: The red circle shows where the cursor position is located on the status bar.
If your code editing environment doesn't have a simple way to measure or flag line length like this, the next best option is to paste in a line of 83 characters like the following and resize your code window so this fits but anything longer wraps:
12345678901234567890123456789012345678901234567890123456789012345678901234567890123
Code Font within Running Text
It often occurs that certain terms, such as parameters, arguments, tag names, methods, properties, events, statements, variables, stored procedures, Web addresses, and commands might need to appear as code within running text. Please consult with your PjE for guidance on formatting those particular terms so they will convert automatically to a monospaced font during layout. Be sure to discuss with your Development Editor which terms you want to show in monospaced font early in the process, because that tends to vary from book to book, and the convention needs to be set at the beginning.
Preparing Code for Download
As you know, Wrox readers often use code provided by the authors at Wrox.com. To facilitate ease of use for your readers, you'll need to organize your files accordingly.
Be sure that every time you indicate (with the icon and the code note) you're going to provide downloadable code that you do. Make sure the filenames match. We suggest keeping a running list in a Word document where you copy and paste your icons and listings by chapter. From there, follow these general guidelines:
- Include a readme.txt file describing the contents, limitations, and requirements. In your description of the contents, be sure to add which chapters do and do NOT have code. If it's a multi-author book and individual authors provide their own readme files, it should be done per chapter, and those individual readme files should be mentioned in the master readme.
- If the total code download is around 20Mb or less, the best practice is to put all the code in one zip, unzipping into folders for each chapter or project.
- If the code download is bigger, it should be provided both as a single download but also as individual chapter downloads.
- Either way, the root of the code should unzip into an ISBN or book folder for the book, with the chapters within that.
- Avoid nested zips within zips. It's not handy for readers to download the zip for chapter 1 and find that there are 5 zips in it for example. Proper project/folder naming in zips should avoid the need for most nested zips.